Learning Objectives
By completing this lesson, you will be able to:
-
Understand the three basic types of worksheet relationships: one-to-one, one-to-many, and many-to-many.
-
Use the Relationship field to establish relationships between worksheets.
-
Aquire the meaning and configuration steps of Bi-Association.
Scenario Case
With your support, MEGA has successfully completed the digitalization of employee records, migrating from Excel-based management to an Application. Now, the HR department wants to further expand the app to include departments, positions, and training courses, aiming to improve efficiency and standardization in HR management.
To achieve this, the App must support the following requirements:
-
Employee–Department Relationship
-
Each employee should belong to a specific department.
-
In each department record, the HR team should be able to view all employees under that department for a clear organizational structure.
-
Employee–Position
-
Each employee holds one position (multiple roles are not considered for now).
-
Training courses and Feedback
-
HR should be able to assign various training courses to employees.
-
Each employee may attend multiple programs, and each program may involve multiple employees.
-
After completing a program, employees should be able to provide ratings and feedback, offering valuable input for future training improvements.
Data Model Analysis
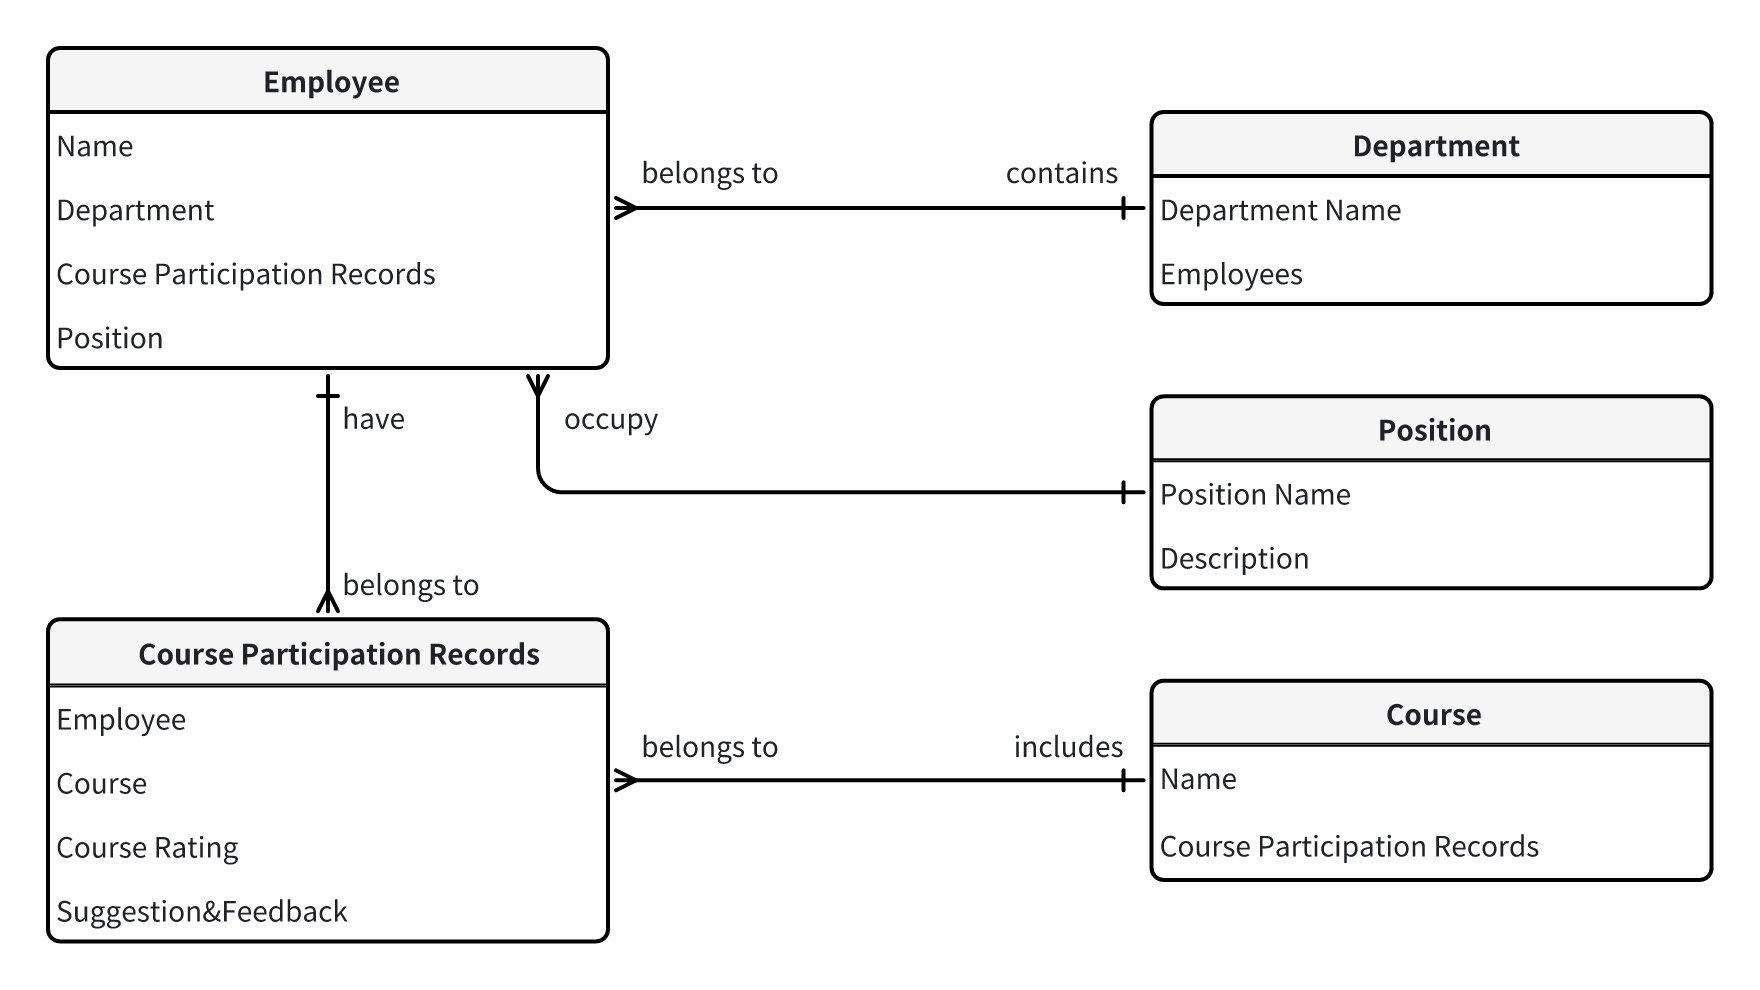
In this scenario, the core data objects include: Employee, Department, Position, and Training Course.
-
Each Employee is assigned to one Position.
-
There is a one-to-many relationship between Department and Employee: Each employee belongs to one department, while each department can contain multiple employees.
Meanwhile, the relationship between Employee and Training Course is many-to-many:
Additionally, the App needs to capture feedback data — such as ratings and comments — for each employee’s participation in a course. This means the basic many-to-many relationship must also carry additional attributes.
To address this, the data model introduces a new intermediate data object: Course Participation Record. This worksheet serves to:
-
Establish the many-to-many relationship between Employee and Training Course
-
Store additional business data for each participation, such as rating and feedback
The Course Participation Record is not just a linking entity — it also holds key information related to training activities, making it a crucial component of the overall relational model.
Based on this analysis, we can draw an ER diagram to illustrate the data structure for this scenario.
Step-by-Step Instructions
Create the Employee Directory Worksheet
This step was completed in the previous lesson, so you can skip it.
Create the Department Worksheet
-
Click the + Create button and select + From Scratch to create a new worksheet named Department.
-
In the Department worksheet, add the following fields:
|
Field Name
|
Field Type
|
Description
|
|
Department Name
|
Text
|
|
|
Department Manager
|
Members
|
|
-
Add sample department records to the worksheet, such as:
-
Sales
-
R&D
-
Marketing
-
Operations
-
Human Resources
Establish Association Between Employee and Department
Add an Association Field – Department
-
Click the “···” icon on the Employee Directory worksheet and select Edit Form to enter the form design page.
-
On the form design page of the Employee Directory worksheet, add a Relationship field and associate it with the Department worksheet.
-
After adding the Relationship field, select it and go to the right panel. Set the field name to Department, and set the Relationship Quantity to Single row. Once done, click Save, then click Close.
Edit Employee's Department
-
You can select multiple employees and quickly update their associated departments using Batch Edit.
-
After completing the department assignment, you can clearly see the department each employee belongs to.
Establish Bi-Association between Department and Employee
When we click into the detail page of a department, we cannot see which employees belong to this department. For example, in the Employee Directory, there are three employees whose associated department is the Sales Department. How can we display these three employee records within the Sales Department? We can achieve this through a Bi-Association.
-
Edit the Department worksheet, add a relationship, choose existing association, and select the Employee Directory.
-
A department can have multiple employees, so we should set the Relationship Quantity to Multiple row. At the same time, you can configure the Display Field from the Employee Directory.
-
After configuration is complete, save and close the form design page. Open the detail page of the Sales Department in the Department worksheet, and you will see that the employee records associated with this department have been automatically synced from the Employee Directory. Moreover, any employee records associated with this department in the future will also be automatically synced.
Create the position worksheet
Create a Position worksheet with the following fields:
|
Field Name
|
Field Type
|
Description
|
|
Position Title
|
Text
|
|
|
Position Description
|
Multi-line Text
|
|
Add sample data as follows:
|
Position Title
|
Position Description
|
|
Account Manager
|
Responsible for developing and maintaining enterprise client relationships, promoting smart hardware and SaaS product sales, formulating sales strategies, and achieving performance targets.
|
|
R&D Engineer
|
Participate in the backend system design and development of the company’s cloud platform; responsible for high-concurrency architecture and API integration.
|
|
Marketing Specialist
|
Plan and write content for the company’s WeChat account, website, and social media; responsible for brand content planning, communication, and promotion.
|
|
HR Specialist
|
Responsible for employee recruitment, designing compensation structures, and organizing onboarding training programs.
|
|
Operations Specialist
|
Handle internal operations, analyze business data, and generate operational analysis reports.
|
Establish a relationship between Employee and Position.
Add a relationship field – Associated Position.
-
Click the "···" icon of the Employee Directory, then click "Edit Form" to enter the form design page of the Employee Directory.
-
On the form design page of the Employee Directory, add a Relationship field, select the Position worksheet to associate with, name it "Associated Position", and set the Relationship Quantity to Single row,then Save and Close.
Edit Employee's Associated Position
After the Employee Directory is associated with the Position worksheet, you can select the associated position for each employee.
Add Group
When you have many worksheets, you can create groups to organize them by category. Groups will appear in the top navigation, making it easy to quickly switch between different types of worksheets.
We can add a group named "Organization" to store Employee Directory, Department, and Position. Then add another group named "Courses" to store forms related to courses later on.
Create Course Worksheet.
-
Under the "Courses" group, create a Course worksheet and add the following fields:
| Field Name |
Field Type |
Description |
| Course Name |
Text |
|
| Instructor |
Member |
|
| Course Description |
Text |
|
| Course Materials |
Attachment |
|
-
Add some sample course data, such as:
-
Corporate Culture and Policy Orientation
-
OA App Operations and Process Guidelines
-
Communication Skills and Cross-Department Collaboration
Create Course Participation Records worksheet.
Add field
Under the "Courses" group, create a Course Participation Records worksheet and add the following fields:
| Field Name |
Field Type |
Description |
| Employee Directory |
Relationship |
Associate with Employee Directory, single row |
| Participated Course |
Relationship |
Associate with Course worksheet, single row |
| Class Date |
Date |
|
| Course Rating |
Level |
|
| Feedback & Suggestions |
Text |
|
Set the title field appropriately.
When setting the title field for the "Course Participation Records" worksheet, many beginners may feel confused: which field should be used as the title? Should it be the class date, the rating, or the feedback? While all these fields carry informational value, none of them are distinctive or unique enough to intuitively represent a single course participation record.
When no single field can clearly represent the record, you can use a Concat field to combine multiple pieces of key information into a more recognizable title. In this case, we can do the following:
-
Add a "Employee Name" text field, and set its default value to =Employee Directory.Name;
-
Add a "Course Title" text field, and set its default value to =Course.Name;
-
Add a Concat field that joins "Employee Name - Course Title - Class Date", for example: =Employee Name + "-" +
Course Title + "-" + Class Date
A title like Zhang Wei - Communication Skills and Cross-Department
Collaboration - 2025-04-18 provides a clear and immediate representation of key information in the list view, greatly enhancing the efficiency of record identification.
Auto-fill fields using default value.
-
Add a text field, name it "Employee Name", and set the default value using Default Value - Use Dynamic Values - Other field values. At this point, you can select the employee name from the associated record in the Employee Directory.
-
Similarly, add a text field named "Course Title", and set the default value using Default Value - Use Dynamic Values - Other field values. At this point, you can select the course title from the associated record in the Course worksheet.
-
Finally, to enable permission management—such as allowing each employee to view only their own course participation records—we can add a Member field. Name the field "Employee Account" and set the default value using Default Value - Use Dynamic Values - Other field values, selecting the employee account from the associated record in the Employee Directory.
Join multiple fields using a concat field.
Add a concat field to join "Employee Name - Course Title - Class Date", and set this concat field as the title. After the setup is complete, you can drag and drop fields to adjust their display position and order.
Result
After the configuration is complete, save and close the form design page. When creating a course participation record, you will see the following results:
-
After selecting the Employee Directory and Course, the Employee Name and Course Title will be auto-filled.
-
The title field will automatically display the combination of “Employee Name - Course Title - Class Date”.
Display course participation records in both Employee and Course.
Since the Course Participation Records already associates both Employee and Course, we can similarly use a Bi-Association to display participation records on the detail pages of both the Employee Directory and the Course worksheet.
Create a Bi-Association between Employee Directory and Course Participation Records.
-
Click the "···" icon of the Employee Directory, then click "Edit Form" to enter the form design page of the Employee Directory.
-
In the Employee Directory, add a relationship field and select existing association – Course Participation Records.
-
An employee can have multiple course participation records, so we should set the Relationship Quantity to Multiple rows. At the same time, configure the appropriate display fields.
-
After the setup is complete, save and close the form design page. Open the detail page of an employee, and you will see all the courses this employee has participated in.
Create a Bi-Association between Course and Course Participation Records.
-
Click the "···" icon of the Course worksheet, then click "Edit Form" to enter the form design page of the Course worksheet.
-
In the Course worksheet, add a relationship field and select existing association – Course Participation Records.
-
A course can have multiple employee participation records, so we should set the Relationship Quantity to Multiple row. At the same time, configure the appropriate display fields.
-
After the setup is complete, save and close the form design page. Open the detail page of a course, and you will see all the participation records of employees for this course.
Hands-on Practice
Now, click the "Open the Practice App" button in the upper right corner of the page to access the hands-on application designed for this course, and start practicing!